
Great news for those of you that love your Gel Manicures! Sally Hansen recently introduced an easy to use, economical, at-home
Gel Manicure Nail Polish Kit that costs less than $65. When you get a gel manicure at a salon, you can pay anywhere from $30 to $50 and up PER manicure. With this at-home kit, you can do up to 10 manicures that will last at least a week or more.
Now, admittedly, I had never had a gel manicure before this, so I didn't have a lot to compare it to. That said, it wasn't as hard as I anticipated it would be. It took me about an hour from start to finish and I don't think it would take me nearly as long the second time around. The first 15 minutes was reading the enclosed instructions to make sure I knew what I was doing before I started. Always best to venture into these things well prepared!
I started with very clean, freshly washed and dried, naked nails.

I then read the enclosed, easy to understand instructions one last time before I began.

Then I placed everything out on the table to make sure I had everything easily accessible. You don't want to be digging around in the box with wet nails!

Before you begin, you have to clean your nails with the enclosed Nail Cleanser Pads that come with the Gel Manicure Nail Polish kit to make sure your nails are totally and completely clean. You want to get into every crack and crevice and make sure that you cuticles are well moisturized (previous to this step) and do not have any loose edges.

First, you put a thin layer of "Step One" bottle one each finger nail on your left hand. You then promptly place it under the UV lamp to "set".

It leaves your nails looking like you put on a shiny top coat, but don't let it fool you. Nails are still tacky at this point and you do NOT want to let them touch anything.

Second, you put a thin layer of "Step Two" bottle (the actual color - in this case it was "Red My Lips") on the same hand and put it under the UV light for 30 seconds. Repeat with another thin layer on the same hands and put under the UV lamp for an additional 30 seconds.

At this points, nails are still tacky and you want to be super careful with them! The final step is what hardens and "sets" the manicure. After you apply a thin layer of "Step Three" bottle and dry it under the light for 30 seconds, you are left with an INSTANTLY touchable, totally hardened gel manicure.

After you finish your left hand, you then repeat all the steps all over again on your right hand. Then you're done! You are left with a mirror shine, no dry time and indestructible, chip-free manicure that will supposedly last for up to two weeks.
Mine lasted for 8 days before 2 of the nail edges lifted and got caught on stuff and ripped off. After that it was one nail after another that the edges lifted up, got caught on something and that was it. I attempted to repair one of them with the "Step three" bottle and 30 seconds under the light, but that only worked for a day. It warns not to get it anywhere near your cuticles. I made every attempt not to get it near my cuticles, but I thought perhaps I had put the polish too close to the edges and that's why it failed before it's alleged 2 week lasting power.
My friend came to visit and I asked her if I could try the Sally Hansen Gel Manicure Nail Polish kit on her and she was more than happy to oblige! So I got a second shot at trying the whole process and it was slightly easier since I wasn't doing my own nails. I stayed far away from the cuticles and edges. The process from start to finish only took a little over half an hour this time. Much more reasonable.
However... her manicure only lasted 5 days before all the edges lifted up and she ended up ripping them all off out of frustration. (I don't recommend doing that because it can take a layer of your nail off.) She said that if it had lasted longer that she would have loved it and totally bought one of the kits for herself.
Overall, I would probably recommend this kit. It certainly lasted MUCH longer than
regular nail polish does on me. It took me about the same amount of time to apply as the Sally Hansen Nail Polish Strips, but didn't last quite as long. So the nail polish strips from Sally Hansen would still be my number one preference, but this would definitely be a runner up. It's on par with
COVERGIRL Outlast Stay Brilliant Nail Gloss that lasted the same amount of time with a finish that was just as glossy as the gel manicure.
Basically, it lasted more than a week, it had a high gloss finish the entire time and it never chipped. When the edges started to lift up, it wasn't visible, it was just disconcerting if you ran your fingers through your hair. I'm sure if I didn't play with it, I could have made it last a tiny bit longer, but as soon as the edges started lifting, I just couldn't leave them alone. Also, I was doing a lot of demanding activities like floor scrubbing, bathing two dogs, vacuuming, laundry, baking, cooking, washing 2 children, putting up Christmas lights outside, etc. I'm sure for someone with an office job, this Gel Manicure Nail Polish kit would easily last the proposed two weeks.
You can purchase Sally Hansen Gel Manicure Nail Polish at Target, Walmart, chain drug stores such as Walgreens, CVS, Rite Aid, food stores and mass retailers nationally. The kit retails for $64.99 and it would make a great Christmas gift for someone who loves nail polish! For more information, visit SallyHansen.com
Check out our other
nail posts over at TheFashionableHousewife.com and our
favorite nails on Pinterest!
Subscribe to A Girl’s Gotta Spa! for more beauty reviews! Got a Kindle?
We’re on Kindle too!
*Disclosure

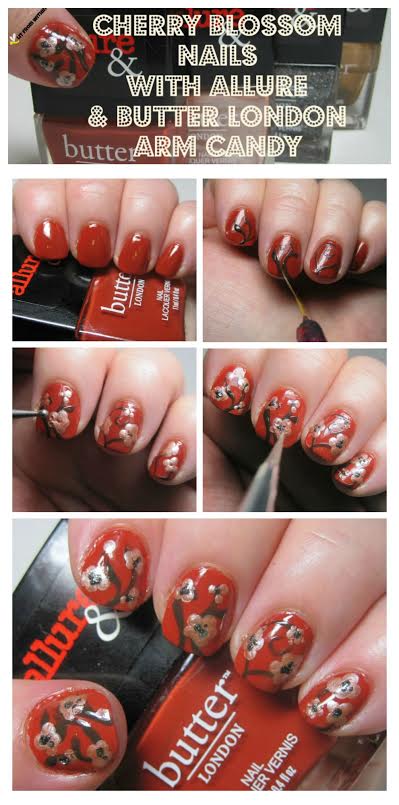
 I'm loving all the rich Fall colors in the new Butter London x Allure collection! I'm not yet ready for Fall, but I'm okay with winding down this hot, hot Summer. So, let's do a mani of a typical Spring flower - the cherry blossom!
What you'll need:
I'm loving all the rich Fall colors in the new Butter London x Allure collection! I'm not yet ready for Fall, but I'm okay with winding down this hot, hot Summer. So, let's do a mani of a typical Spring flower - the cherry blossom!
What you'll need:


 First, bleaching noticeable hair is actually pretty simple. There's not too much involved and it can be accomplished in about 10 minutes and last for up to 4 weeks - so it is definitely something you can squeeze into your beauty routine without having to put aside a large amount of time or use a plethora of products for that matter.
Jolen, an at-home beauty staple for millions of women for the last 50 years, has an easy peasy Creme Bleach that not only lightens facial hair such as on your upper lip, cheeks, chin and even your brows, but it will also lighten arm and body hair, as well. Jolen Creme Bleach comes in an original formula as well as a sensitive formula with Aloe Vera, which is ideal for use on sensitive, more delicate skin.
First, bleaching noticeable hair is actually pretty simple. There's not too much involved and it can be accomplished in about 10 minutes and last for up to 4 weeks - so it is definitely something you can squeeze into your beauty routine without having to put aside a large amount of time or use a plethora of products for that matter.
Jolen, an at-home beauty staple for millions of women for the last 50 years, has an easy peasy Creme Bleach that not only lightens facial hair such as on your upper lip, cheeks, chin and even your brows, but it will also lighten arm and body hair, as well. Jolen Creme Bleach comes in an original formula as well as a sensitive formula with Aloe Vera, which is ideal for use on sensitive, more delicate skin.
 How to Lighten Excess Facial Hair:
1. Wash the area to be bleached with soap and cold water, then pat dry.
2. Measure one quarter teaspoon (with the spatula provided) of the Accelerator powder and place it into the cup (also provided.)
3. Rinse off the spatula and re-use it to measure one half teaspoon Creme Bleach into the cup and blend with the powder.
4. Looking in a magnifying mirror, such as the Conair Illuminated LED Mirror, apply the mixture with the spatula to the area to be bleached, covering all of the hair completely.
5. Wait 10 minutes, then remove the paste with the spatula and wash the area with cold water.
That's it! The bleach is gentle to skin and leaves it soft and smooth and the whole process is practically effortless. Since bleaching can last up to 4 weeks, this is a process you only have to do once a month. It's less painful than waxing (doesn't hurt at all) and less messy/irritating than depilatory creams.
How to Lighten Excess Facial Hair:
1. Wash the area to be bleached with soap and cold water, then pat dry.
2. Measure one quarter teaspoon (with the spatula provided) of the Accelerator powder and place it into the cup (also provided.)
3. Rinse off the spatula and re-use it to measure one half teaspoon Creme Bleach into the cup and blend with the powder.
4. Looking in a magnifying mirror, such as the Conair Illuminated LED Mirror, apply the mixture with the spatula to the area to be bleached, covering all of the hair completely.
5. Wait 10 minutes, then remove the paste with the spatula and wash the area with cold water.
That's it! The bleach is gentle to skin and leaves it soft and smooth and the whole process is practically effortless. Since bleaching can last up to 4 weeks, this is a process you only have to do once a month. It's less painful than waxing (doesn't hurt at all) and less messy/irritating than depilatory creams.
 Where's your trouble spot for noticeable hair -- lip, cheeks, arms, elsewhere?
Jolen Creme Bleach formulas can be found in stores nationwide, including CVS, Harmon, Rite Aid, ULTA, Walgreens and Walmart, as well as online. They are also cruelty free.
LIKE Jolen's Facebook page for glam, giveaways and beauty tricks from celebrity makeup artists! Now through November 14, 2014, enter the Jolen 50th Giveaway for a chance to win $50 gift cards to Jolen retailers, as well as Jolen Creme Bleach product. More than 50 winners! #GoConfidently
Stay connected to Jolen for offers, giveaways and the latest in beauty tricks from celebrity makeup artists at
Where's your trouble spot for noticeable hair -- lip, cheeks, arms, elsewhere?
Jolen Creme Bleach formulas can be found in stores nationwide, including CVS, Harmon, Rite Aid, ULTA, Walgreens and Walmart, as well as online. They are also cruelty free.
LIKE Jolen's Facebook page for glam, giveaways and beauty tricks from celebrity makeup artists! Now through November 14, 2014, enter the Jolen 50th Giveaway for a chance to win $50 gift cards to Jolen retailers, as well as Jolen Creme Bleach product. More than 50 winners! #GoConfidently
Stay connected to Jolen for offers, giveaways and the latest in beauty tricks from celebrity makeup artists at 


