
Pedicure How-To: Get Your Feet Sandal-Ready! #Sponsored
This post was sponsored by Amopé™ as part of an influencer activation for the #AmopeCrowd and Socialstars™. I received complimentary products to facilitate my review, but all opinions (and sandal-ready feet) are my own.
 Florals and citrus, a shorter hairstyle, light breezy dresses, sandals...warmer weather opens the doors to both shed our winter layers and reveal some skin.
Depending on how you look at it, this can be a welcomed change, or something that you dread. I used to be embarassed to wear sandals or my favorite flip-flops out in public. It always seemed that no matter what I did, I could not reign in the cracks on my heels or the dryness on the tops of my toes. (Please tell me I'm not alone.)
Sure an amazing pedicure at one of my favorite local spas would whip my feet into shape, but only for a short time. As much as I enjoy time at the spa, it's not always in my budget and sometimes I just can't swing my schedule. So finding the right products to get that spa-worthy pedicure at home is something I'm always on the hunt for and I think I finally found the right mix.
Florals and citrus, a shorter hairstyle, light breezy dresses, sandals...warmer weather opens the doors to both shed our winter layers and reveal some skin.
Depending on how you look at it, this can be a welcomed change, or something that you dread. I used to be embarassed to wear sandals or my favorite flip-flops out in public. It always seemed that no matter what I did, I could not reign in the cracks on my heels or the dryness on the tops of my toes. (Please tell me I'm not alone.)
Sure an amazing pedicure at one of my favorite local spas would whip my feet into shape, but only for a short time. As much as I enjoy time at the spa, it's not always in my budget and sometimes I just can't swing my schedule. So finding the right products to get that spa-worthy pedicure at home is something I'm always on the hunt for and I think I finally found the right mix.
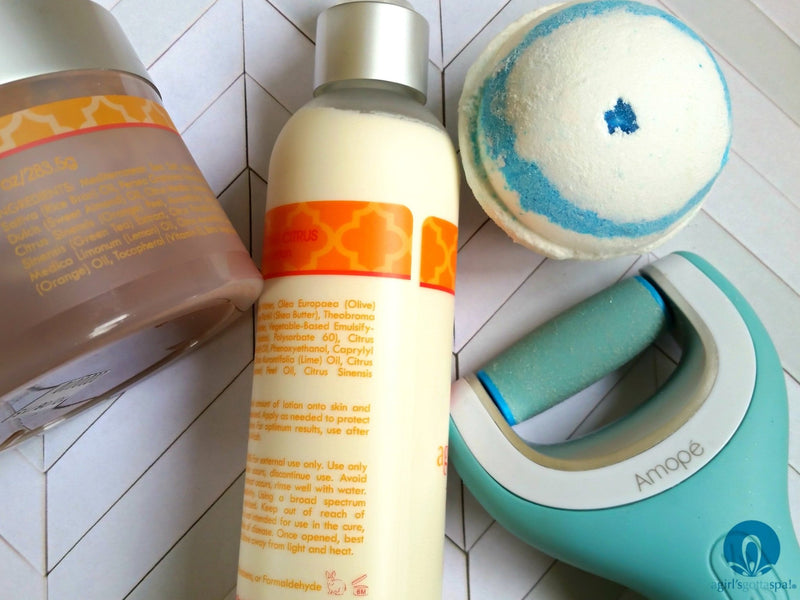
 I've been talking about the Amopé™ Pedi Perfect Wet & Dry Rechargeable Foot File for a few months now and I have to say, my feet have never looked better. I've been using it 2-3 times a week to exfoliate my feet using it on two speeds and both wet and dry.
How-To Pedicure on Dry Skin:
Doing a pedicure on dry skin with no water involved is easy peasy and literally only takes a few minutes. I'd recommend this when you don't really have too much time for a full-on pedicure. I squeeze this in while I am watching one of my favorite shows (The Walking Dead, Fear the Walking Dead, Shark Tank, The Profit, etc.)
1. Put a few sheets of paper towel under your feet, and turn your Amopé™ Pedi Perfect on the highest speed (press the top button once.) I use this setting just for my heels, the sides of my feet and my big toe (for some reason I tend to get calluses on that toe the most.) Do this for a good 60-90 seconds moving the electronic foot file up and down. It works fast, so this amount of time is plenty.
2. Next, turn it to the lowest setting (hit the top button twice) and focus on the ball of your feet, gently on the tippity top of your toes (avoiding your nails) and anywhere else that your feet are sensitive. This will only take you less than 60 seconds.
3. Most of the exfoliated skin will be on the paper towels, but if there are any on your feet, just gently wipe it off.
4. Apply cuticle softener then clip and file your toe nails. Then push back your cuticles.
5. Apply your favorite lotion, which you'll notice will quickly absorb into your skin now that you got rid of the dead skin.
6. Last step is applying your favorite polish and top coat.
I've been talking about the Amopé™ Pedi Perfect Wet & Dry Rechargeable Foot File for a few months now and I have to say, my feet have never looked better. I've been using it 2-3 times a week to exfoliate my feet using it on two speeds and both wet and dry.
How-To Pedicure on Dry Skin:
Doing a pedicure on dry skin with no water involved is easy peasy and literally only takes a few minutes. I'd recommend this when you don't really have too much time for a full-on pedicure. I squeeze this in while I am watching one of my favorite shows (The Walking Dead, Fear the Walking Dead, Shark Tank, The Profit, etc.)
1. Put a few sheets of paper towel under your feet, and turn your Amopé™ Pedi Perfect on the highest speed (press the top button once.) I use this setting just for my heels, the sides of my feet and my big toe (for some reason I tend to get calluses on that toe the most.) Do this for a good 60-90 seconds moving the electronic foot file up and down. It works fast, so this amount of time is plenty.
2. Next, turn it to the lowest setting (hit the top button twice) and focus on the ball of your feet, gently on the tippity top of your toes (avoiding your nails) and anywhere else that your feet are sensitive. This will only take you less than 60 seconds.
3. Most of the exfoliated skin will be on the paper towels, but if there are any on your feet, just gently wipe it off.
4. Apply cuticle softener then clip and file your toe nails. Then push back your cuticles.
5. Apply your favorite lotion, which you'll notice will quickly absorb into your skin now that you got rid of the dead skin.
6. Last step is applying your favorite polish and top coat.
 How-To Pedicure on Wet Skin:
One of the best things about the Amopé™ Pedi Perfect Wet & Dry Rechargeable Foot File is that it is waterproof so you can use it in the shower and around water. Sometimes I just use it in the shower (again, when I am short on time) and sometimes I soak my feet to really soften them up.
1. Grab a plastic basin and fill it with warm water. Drop in a bath bomb - a mini bath bomb will do the trick, but most of the time I only have medium-sized ones on hand. The epsom salt will help to purify and remove toxins and the fragrance is always a great stress reliever. Soak for a good 5-10 minutes.
2. Follow steps 1 and 2 from the dry pedicure how-to minus the paper towels.
3. Grab your favorite salt scrub (mine is citrus) and scrub between your toes, around your nail beds and then a once over your entire foot. I love salt scrub for this because it has just the right amount of grit to really exfoliate where the electronic foot file can't go. The moisturizing oils in mine really hydrate my feet too.
4. Rinse and pat dry leaving your feet slightly damp.
5. Apply your favorite hydrating lotion - and don't forget between your toes (I feel like this is often overlooked!)
6. Then follow steps 4 and 6 from above.
You could of course do this while watching your favorite shows too, it just takes a bit longer. These steps can be done in the shower, as well, naturally waiting to do steps 4 and 6 until you are actually out of the shower!
I do the dry, quick version 2x a week and then do the wet version via shower once a week. Once a month I do the wet version with the basin and bath bomb. It makes a huge difference and I'm no longer embarassed by my feet. They are super soft, hydrated and are no longer dry and cracked.
If you follow this how-to I would LOVE to hear from you, let me know the difference it makes in your feet!
Follow Amopé™ on Facebook!
Subscribe to A Girl’s Gotta Spa! beauty blog. Watch our reviews on YouTube, see our pins on Pinterest and check us out on Instagram and G+. Got a Kindle? We’re on Kindle too!
How-To Pedicure on Wet Skin:
One of the best things about the Amopé™ Pedi Perfect Wet & Dry Rechargeable Foot File is that it is waterproof so you can use it in the shower and around water. Sometimes I just use it in the shower (again, when I am short on time) and sometimes I soak my feet to really soften them up.
1. Grab a plastic basin and fill it with warm water. Drop in a bath bomb - a mini bath bomb will do the trick, but most of the time I only have medium-sized ones on hand. The epsom salt will help to purify and remove toxins and the fragrance is always a great stress reliever. Soak for a good 5-10 minutes.
2. Follow steps 1 and 2 from the dry pedicure how-to minus the paper towels.
3. Grab your favorite salt scrub (mine is citrus) and scrub between your toes, around your nail beds and then a once over your entire foot. I love salt scrub for this because it has just the right amount of grit to really exfoliate where the electronic foot file can't go. The moisturizing oils in mine really hydrate my feet too.
4. Rinse and pat dry leaving your feet slightly damp.
5. Apply your favorite hydrating lotion - and don't forget between your toes (I feel like this is often overlooked!)
6. Then follow steps 4 and 6 from above.
You could of course do this while watching your favorite shows too, it just takes a bit longer. These steps can be done in the shower, as well, naturally waiting to do steps 4 and 6 until you are actually out of the shower!
I do the dry, quick version 2x a week and then do the wet version via shower once a week. Once a month I do the wet version with the basin and bath bomb. It makes a huge difference and I'm no longer embarassed by my feet. They are super soft, hydrated and are no longer dry and cracked.
If you follow this how-to I would LOVE to hear from you, let me know the difference it makes in your feet!
Follow Amopé™ on Facebook!
Subscribe to A Girl’s Gotta Spa! beauty blog. Watch our reviews on YouTube, see our pins on Pinterest and check us out on Instagram and G+. Got a Kindle? We’re on Kindle too!
Add a comment
* Comments must be approved before being displayed.


12 comments