DIY Spa Treatments for the Sauna

Gail Lewis
DIY Sauna #Beauty Products 
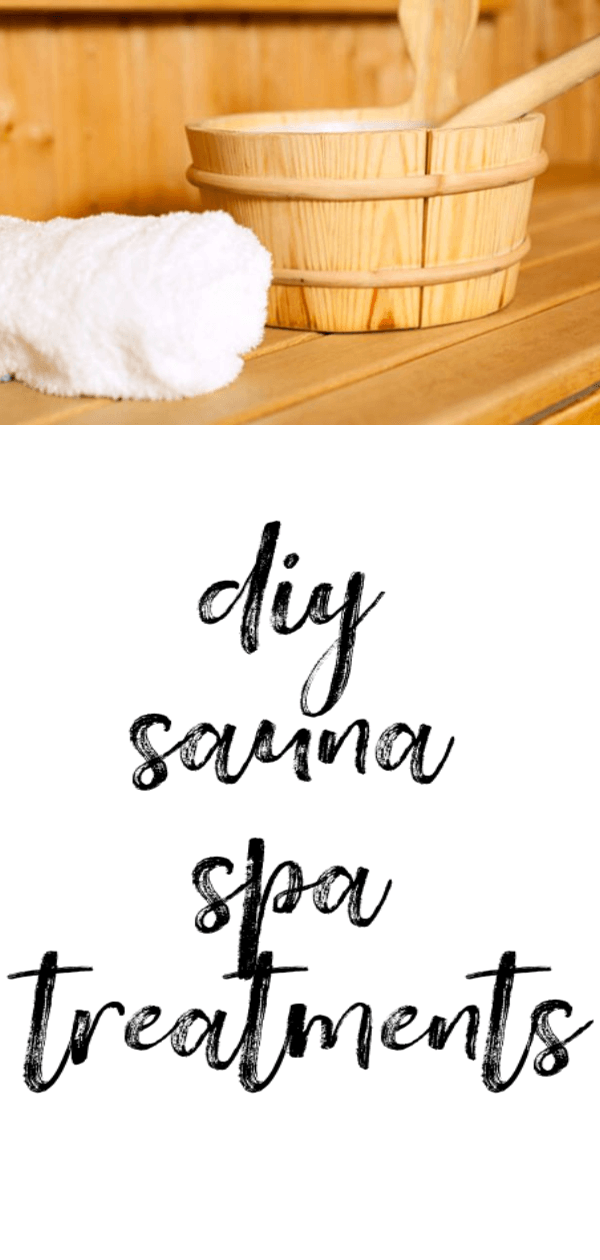
By now you all know how much those of us here at A Girl's Gotta Spa! adore spa treatments, we practically live for them.  But we can all agree that spa treatments are not always budget friendly, so I am always looking for ways to get the results of spa treatments without shelling out a fortune. Lately I've been experimenting with a few DIY at home (or in the sauna at the gym) spa treatments and I thought I would share two of my favorites with you.  I do have to warn you that you may get strange looks from a few people...just be prepared. I love getting weekly deep conditioning treatments for my hair, but at about $50 per treatment and add in the cost of haircuts and coloring--and I would be devoting a good portion of my monthly income to my hair. So instead of going to the salon for deep conditioning treatments, I cart my deep conditioning treatments with me to the gym on the days I plan on using the sauna. While in the sauna I just apply whatever deep conditioning treatment I feel like my hair needs that week (a restructuring mask, hydrating treatment or nourishing oil) to my hair, wrap it in a towel and just sit there for 10-15 minutes and let the heat do its work.
DIY Sauna Spa Treatments #diy #sauna #spa Another treatment I do while in the sauna is a face mask (again either hydrating, deep cleansing or exfoliating.)  I wait until about 5-10 minutes before I plan on getting out of the sauna then apply the mask.  My favorite to apply while in the sauna is the Kate Somerville Exfolikate Intensive Exfoliating Treatment because I have noticed a big difference between using this in the sauna and just using it at home.  Yes, it tingles more because the heat loosens the debris in my pores a lot more than just using it at home. My skin also looks and feels cleaner and brighter after I use this treatment in the sauna. Whenever I use the sauna at the gym I always leave feeling a lot more relaxed and cleansed...very similar to the feeling I get when I leave the spa. So combine that feeling of relaxation with a few mini sauna beauty treatments and you've almost got yourself a bonafide spa experience...minus the plush robes, soothing music and so on, but you'll have better looking hair and skin without the spa price tag.  Just don't say I didn't warn you about the perplexed looks might receive from a few people.

Read more →

Hairstyle How To: Creating the Perfect Ponytail

Gail Lewis8 comments
Just like me, you've probably thought that creating a ponytail is just about the easiest hairstyle to accomplish. I mean how difficult could it be? You grab a hair tie, pull all your hair back and secure it with the hair tie and voila! Well as I have learned, mostly from being on set and watching hairstylists, that way is just fine and dandy, but if you want to create the perfect ponytail you have to throw a few additional steps in there.

How to Create the Perfect Ponytail

Step 1: Create a part from ear to ear (from the back of the ear, across the top of the head to the back of the other ear.) Step 2: Clip the front part of the hair out of the way and tilt your head back slightly (to ensure that it does not end up saggy or buckles.)

Step 3: After deciding on placement (low, high or middle of the head), brush rear portion of hair into your hand loosely holding it, and with the other hand grab the ponytail tight against the head and secure with a hair tie.

Step 4: Release the top section with your head still tilted back slightly and brush front portion directly into the other section of hair (trying to avoid disruption of the other ponytail, but don't be afraid to brush the hair straight into and over the previously created ponytail) and secure with an elastic hair tie in the exact same way as above.

Step 5: Using hairspray for fly-aways, lightly smooth and spray fly-aways with hands or a fine tooth comb...only lightly skimming the top of the hair.

Bonus step: If you would like to make the ponytail sleeker or dress it up a bit, try grabbing a small section of the ponytail near the elastic hair tie and begin wrapping it around the elastic to hide the hair tie.  Secure wrap with a hair pin and bobby pin making sure that the pin is not visible.

And there you have it, two versions of the perfect ponytail...thanks to amazing hairstylist Pearson Knight for walking us through creating the perfect ponytail!

Read more →

Tween Self Esteem Booster at Ted Gibson Salon

Shannon Smyth5 comments
My niece Emily is a beautiful girl, both inside and out. The last year and a half has had a lot of changes for her though: her grandmother passed away from lung cancer, her grandfather had a stroke, and my sister and her husband took in 3 of his nephews who were going to be placed into foster care (and they are now in the process of adopting them.) Her husband's sister and her daughter also moved in with my sister. Did I mention that my sister has 4 kids already, two of which are special needs? We lovingly refer to my sister's family as The Duggars. But joking aside, Emily, who is 10 years old, began to get depressed and with the adjustment to her new family life, lost sight of her dreams.

Me, Emily and my sister Courtney

I love my niece to pieces and she has always talked about going to New York. She's heard me talk about my trips to fashion week and to various events and who I've met along the way, so I knew that for her 10th birthday I wanted to surprise her with a trip into the city. With many thanks to Jason Backe and Ted Gibson of Ted Gibson Salon and Melanie Notkin of Savvy Auntie, I hatched a plan to have Emily's hair done at Ted Gibson Salon, as well as take Em to the top of the Empire State Building with a journal in hand to write down what her hopes and dreams were. My sister and I were reflecting on how this in-between time has an effect on a young girl's self esteem. Like many girls these days, puberty is hitting some younger than others. This has really had an effect on Emily and she has tried to downplay it by hiding her body under vast layers of clothes, not really taking care of her hair and overall creating a sloppy appearance. While appearance isn't everything, it was clear to me that it was simply a manifestation of how she was feeling on the inside. She didn't want anyone to pay attention to her body changes as girls made fun of her for looking pretty and at the same time would make fun of her if she choose to be sloppy. Either way, kids weren't looking at what a great puppeteer Emily was or how awesome she did in the church drama group. For Em, she just couldn't win. And it hurt her self esteem overall. You can see in many of the pictures before the pampering...Emily never smiles. But once Jill Englesen was done with Emily, check out that smile as she inspected her hair. LOVE it. What was perfect about Jill styling Emily's hair, is that Jill is an artist. She and Emily talked about how much they love to paint. Throughout our time at the salon, Jill kept encouraging Emily to keep painting no matter what. To keep dreaming and to know that she can accomplish anything she sets her mind to.  I know that Jill really made an impact on Em. As my tagline says "because we all deserve a little pampering," I wanted to show Em that sometimes pampering yourself physically can sometimes (OK, many times) pamper you mentally and emotionally as well. I wanted her to see and feel for herself what it was like to take care of herself AND feel good about it--who cares about those girls at school! I wanted her to promise to herself that she would see her dreams through, to know that they are important and that she is a very talented and amazing girl. If there is a girl in your life, whether young or old, be sure to take time to encourage her today. Too many people out there are always trying to bring us down and take away our dreams. I love you Emily. Love, Auntie Shannon UPDATE: Since this post Emily suffered a traumatic brain injury while jumping on a trampoline and getting hit in the temple with a soft ball. She was knocked out and had a severe concussion...but it ended up being so much worse than that. She now gets confused if too over stimulated, had to be excused from finishing school this year because the school work was causing her brain to have her mimic stroke symptoms. She can't read, watch TV or use electronics for more than 15 minutes a day. I cannot even begin to tell you that time is precious and I am so glad that I had taken the time back in December to take her on this trip. This young lady is so important and loved by me.

Read more →

Hair Color Review: John Frieda Precision Foam Colour

Shannon Smyth12 comments
We're heading into the colder months, which typically means making the switch from highlighted hair to warmer tones. My natural hair color is dark brown, but typically I lighten or highlight it in the summer months. Being that it is only 6 weeks until Christmas, getting my hair colored at the salon was not in my wallet's vocabulary, so I opted to color my hair at home. I made my way to CVS and decided upon John Frieda's Precision Foam Colour. I went with 4BG  (Dark Chocolate Brown.)


My highlighted hair before, colored immediately after and results 1 week later.

I have to say, I don't typically read the warnings on home hair coloring kits because I have been coloring my hair since I was 13 and they typically all say the same thing. However, I noticed John Frieda's included some things I have never seen before like you need to remove all accessories you are wearing and cannot use metal tools. Since there seems to be an issue with metal, I assumed that the accessories they meant were jewelry.  So I removed my earrings.

It also says you shouldn't use this product if you have a temporary black Henna tattoo, as it is likely to increase an allergy risk. If you wear contacts, you need to remove them also...however I'm not sure how you could put on your glasses since you can't have metal around. If you've colored your hair previously with compound hennas, metallic dyes or color restorers you have to wait until your hair has grown out and then cut. And don't try to put the foam on your eyelashes or eyebrows because it may cause blindness.

cruelty free body care

So, basically, by the time I was done reading that I was freaked out. Then I went on to read how to mix the product. It says you cannot shake the mix (you need to gently tilt it 5 times,) you cannot use the pump but instead have to squeeze the bottle to make the foam come out of the pump...which is psychologically confusing because you are holding a bottle with a pump...that you cannot pump. The bottle needs to remain upright at all times and you can only apply the foam to your hands first (in gloves of course) and not directly onto your hair. So basically I felt I was going to mess this up big time.

Application was tricky because the instructions state that you cannot get the foam on your face or ears at all. My hair is shoulder length, so good luck with that Shannon! Trying to prevent the foam from touching my skin, while trying to keep the bottle upright and not pump it was like playing a game of Twister.  

Additionally your hair needs to be "frothy" with foam in order to be "done." Ok, guess what? Foam evaporates or absorbs into your hair. Especially if you have long-ish hair and are trying to make sure you get each section equally. Wait time from this point is 30 minutes. I rinsed my hair, applied the conditioner, rinsed that out after 3 minutes and then blew it dry. I was pleasantly surprised with the color. I loved it. Tweeted about it. My 7 year old snapped my pic for me and I was happy I was still alive with great looking hair.

Fast forward 1 week and while my hair is still brown, as you can see from the picture...the color has significantly faded. Ugh. I do not wash my hair everyday, in fact I usually only wash it every other day. I also used sulfate-free shampoo and conditioner, so I know it wouldn't have been the culprit to strip my hair color. I also hadn't washed my hair 24 hours before applying the foam as the instructions stated and I did not have any product build-up to prevent the color from adhering. So was it worth it to save myself the $60-$75 of coloring my hair at the salon? Not really. Have you used John Frieda's Precision Foam? I'd like to hear about your experience (good or bad.)

Read more →

Review: Homemade Deep Conditioning Hair Treatment

Gail Lewis

DIY Deep Conditioning Hair Mask #recipe #haircare Lately I've been into creating my own beauty products. A DIY deep conditioning hair mask has been on my radar for a while now.

I am always obsessed with the condition of my hair and would love for it to always be strong, healthy and shiny, but it seems that lately my hair has been a bit challenged.  My hair seems to be taking a beating from the sun and feels really dry and brittle, and it needs help big time.

DIY Deep Conditioning Hair Treatment #haircare #beauty  
I decided to take advantage of our "Celeb Hair Guru" here at A Girl's Gotta Spa!, Pearson Knight, and asked what would be a great at home deep condition treatment that would help (and that I could create myself) to improve the condition of my hair. Pearson recommended that I do "the olive oil/coconut oil/avocado treatment." Basically this involves combining olive oil, coconut oil and avocados together to create a super moisturizing hair masque. Olive oil, coconut oil and avocado hair mask recipe. I had the coconut oil and olive oil, but I was missing an avocado so off to Publix I went. Of course the olive and coconut oil mixed together well. The avocado on the other hand, I should have gotten an avocado that was softer or should have blended everything in a blender (didn't have one handy as we literally just moved into a new place.) Instead I mushed it with my hands...a fun process and I felt like a kid again.  However, when I started applying the mixture to my hair, there were chunks of avocado stuck in my hair and every time I moved my head they would go flying all around the apartment...I spent all day today cleaning the floors.

Hair after deep conditioning recipe on A GIrl's Gotta Spa! #haircare

I left the mixture in for about an hour then washed it in the shower (still had chunks of avocado all over the bathtub.)  My hair must have been extremely thirsty because I swear it sucked up the mixture.   After washing, I used my regular conditioner, then blow dried.  My hair looked a lot less damaged and shinier - usually after blow drying my hair is really frizzy, but not this time.   Try this DIY deep conditioning hair treatment. #haircare #DIYbeauty I know that with the state my hair is in it will take a few more of these homemade deep conditioning treatments to get it to where I want to be, but the fact that after just one treatment I saw a visible improvement makes me very hopeful. I will caution that if anyone decides to try this at home please be a lot more sensible than I was and use a blender. Also, don't have something on the stove while you're putting this in your hair or you might end up like me with healthier hair but a burnt dinner... Subscribe to A Girl’s Gotta Spa! Watch our reviews on YouTube, see our pins on Pinterest and check us out on Instagram. Got a Kindle? We’re on Kindle too!
 

Read more →

A Girl's Gotta Spa! Hair Makeover for Fall at Salon A.K.S.

Shannon Smyth
A Girl's Gotta Spa! Before at Salon A.K.S.After getting my summer hair coloring at Salon L'etoile, those pesky UV rays had their way with me over the weeks that followed bringing out more of my highlights and lightening my hair considerably. When I went to NYC to attend Cocktails & Couture during fashion week 2 weeks ago, I decided it was time for the hair color switch to fall. I was looking to get back to my dark brown hair color and visited Salon A.K.S. on 5th Avenue to help me with my transformation. With the capable hands of hair colorist, Selma Aktas, and co-owner Alain Pinon working the scissors, I walked away a very happy customer. I explained to Selma that I wanted my hair darker and she flipped my hair over looking right at the roots. She explained that she didn't want to go darker than my original hair color and I agreed. I have to mention the sink for washing and conditioning because typically this is the most uncomfortable part of getting my hair done. You know when you lay uncomfortably into the sink? Well the lip of the sink somehow conforms to your neck, so there is no awkward arching or pressure on the back of your neck. I could simply do the one thing I like to do most---relax. 
In Selma's words..."For fall, my goal was to give Shannon a rich, shiny look. I filled in Shannon's hair so the blonde wouldn't pop out. I also made the color deeper so it doesn't fade out and looks shinier, more healthy. I used L'oreal Power Dose protein treatment to hydrate and make her hair stronger. This is a great post-summer product that helps restore hair from the damages of the sun."
My hair color was definitely dark and I was happy with the shine. Selma is a pro at her job and I highly recommend her! Now onto the cut with Alain..who is so super nice by the way. Hair cut at Salon A.K.S. I explained to Alain that I was tired of my hair doing a flip at the bottom as it touched my shoulders. I said I wanted to look youthful but necessarily young (there's a big difference!) To solve my dilemma he suggested that I cut my hair shorter than it currently was. I don't care who you are, when you hear someone saying to cut your hair shortER, you kind of freak out. He explained that as my hair looked now, I was hiding my neck and that a shorter style would suit me better. My response was, "You can do what you want, just don't make me look like a boy." Looking at this picture, you can see on the white cover just how much length was taken off. Shannon Nelson After Salon A.K.S.To style my hair, Alain's assistant used Phyto Professional Glossing Cream and Phyto Professional Strong Sculpting Gel. And voila! A richer hair color, with a shorter style that suits both my age and face shape. I shouldn't have stood in front of a window for the after shot--however if you go to the A Girl's Gotta Spa! fan page and look in the Cocktails & Couture photo album there are some super pics of my hair. Phyto products can be purchased directly on the Salon A.K.S. website and when you register, you can get product discounts and 10% off any service. They also have a spot on their blog where you can pose questions to Alain or Selma (or any of their experts), just click Ask AKS. So what do you think? If you've been to Salon A.K.S. please share your experience in the comments! Don't forget that you can get 40% off on spa and salon gift certificates at for a participating place near you using discount code AGGS40 on www.icitycerts.com. *Disclosure

Read more →

4 Beauty Blogger's Must-Have Hair Care for Fall

Shannon Smyth
Must-have hair care for fall via @agirlsgottaspa Ever since I had long golden blonde hair with banana curls as a little girl (and then proceeded to cut it off much to my mom's horror when Dorothy Hamil was popular)...I have always been obsessed with hair care products. From hair color (dye, highlights, low lights, etc.) to hair styles and accessories (perms, crimping, hot rollers, flat irons, big hair, long hair, short hair...you name it!)  to hair products (hair masks, hot oil treatments, leave-in conditioners, glossing serums, etc.) I could probably start the Encyclopedia of Hair Care (much like my Encylopedia of Mascaras on A Girl's Gotta Spa! Facebook fan page!) I asked my fellow beauty blogger's their must-have hair care product for Fall and here's what we came up with: Amber from Rouge 18: Living Proof's Full Root Lift Spray is changing the hair landscape as we know it. Without stickiness, it delivers hair that is heavier, volumized and more ample, somehow. It's my new go-to item.   Lianne from The Makeup Girl: Peter Lamas Rice Volumizing Protein shampoo/conditioner. Ever since I have been getting regular keratin treatments to smooth out the frizzies, I have to use sulfate free products when washing my hair. Not only does this give me body without being crazy it's certified organic and super gentle on my hair. Cybele from Cybele Says: Hair straightening systems seem to be all the rage and they seem to just get bigger as time goes on. The latest being Global Keratin Hair Taming System and what's great about this system is that you can choose the level depending on your hair type - Light Wave, Curly or Resistant. Check their site for salons that offer the treatment. Shannon from A Girl's Gotta Spa!: Jonathan Product Green Rootine Dry Shampoo.  On days when my mom-on-the-go schedule is super busy and I don't have time to wash and style my hair, this brush-on powder is perfect. It absorbs excess oil, dirt and product build-up from my hair and scalp, but also increases volume in my hair. What's your must-have hair care product for fall? Don't forget to Like A Girl's Gotta Spa! on Facebook, talk to me on Twitter @agirlsgottaspa and subscribe to this beauty blog! *Disclosure

Read more →

Hair Color Tips from Wella Professionals

Shannon Smyth3 comments
This past Saturday I was given the opportunity to go to the Wella Color Discovery Tour in Philadelphia. Despite the crazy humidity and 92 degree weather, there was a great turn out. But better yet I was able to get hair color tips direct from the Wella Professional stylists who were there to bring them straight to you.

well-color-discovery-tour

But first, pictured here is Rose from Philadelphia. She came out to the Wella Color Discovery Tour because she's never been to a salon for professional hair color before. She's only used home coloring kits that were vegetable-based. Cait from Salon L'Etoile gave her some great recommendations. 
salon-l'etoileCait Kinslow, Salon L'Etoile Question: How long will my color last? Answer: I always tell my clients to come in for a touch up when it starts to bother them. For some, they come in within two weeks while others will wait up until 2 months. Koleston Perfect, which is Wella Professionals' permanent hair color, can last anywhere from 4-6 weeks and Color Touch, which is demi-permanent hair color, will last up to 24 washes. Question: How do I know which hair color is right for my skin tone? Answer: There is a simple trick you can do to figure this out; look at the veins in your wrists. If your veins are green then you would look good with warm tones (like chestnut and reds.) If your veins are blue, then you would look best with cool tones (like ash or pearl blonde.) Michael Antinore, East End Salon101_0303 Question: How can I make my hair color last longer? Answer: Don't shampoo everyday! You need the oils and dirt in your hair for it to stay healthy. Always stick with color-safe shampoo, otherwise you will be stripping the color from your hair. In the summer, a UV protectant spray is also beneficial as it will seal the cuticle to help you retain your color. Question: Why choose a salon versus doing it yourself? Isn't home hair color more affordable? Answer: The directions on DIY box hair color are very easy to mess up. For example, if it is your first time coloring your hair, then your 1st application should always be root to tip. However, for future applications, you only need to color your roots--not your whole head! Many people will just disregard this because it's easier to just apply it to your entire head. However, what happens is that only the roots give you the color you see on the box, but the rest of your hair will be a different color. For Grey hair, which is more pourous, this will be the most noticeable. When you choose home hair coloring kits, essentially you are spending less to spend more (to have a professional fix it.) richard-nicholas-hair-studioRebecca Haig, Richard Nicholas Hair Studio Question: Can you make my hair color like (insert name of celebrity here)? Answer: People bring in pictures of celebrities all of the time asking me to duplicate their hair color. However, they are basing their choice on the celebrity, not the actual hair color. I always tell them to cover the face on the picture, then look at it again to see if they truly want the color. Most times the answer is no. Question: Is blonde the easiest color to change your hair to? Answer: It may be the most popular, but it is not a color you want to try to do on your own. Home hair coloring kits tends to produce more brassy colored and over processed blondes. Also, depending on the color your hair is currently, it may be something you want to fade into gradually. A salon professional can color your hair blonde in a way that leaves it looking more natural, in better condition and with results that will last longer. Liz Wright, Panyc Salonpanyc-salon Liz offered some fantastic tips to help you alter your daily routine in order to achieve a longer and healthier shelf life to your hair color.
  • Like Michael said, don't shampoo everyday. The more you shampoo you make your sebaceous glands go into overdrive producing more oil. Simply, wet your hair, but rub your fingers along your scalp as if you are shampooing. This will help disperse the oils in your hair more evenly.
  • On the days you don't shampoo, it's OK to use conditioner only. However, apply from your tips at the bottom up midshaft, don't apply conditioner to the top of your head.
  • Detangle hair in the shower with your fingers. Hair is most fragile when it's wet. You know that squeaky clean sound when you brush your hair when it's wet? That's the sound of your hair breaking.
  • Water temperature makes a big difference in the health of your hair. My advice, even in the winter, is to turn down the water temperature when shampooing or conditioning. Wash your hair in a temperature you would wash a baby in.
I honestly learned so much from attending this event by Wella. "Like" their fan page to get updates on when their Color Discovery Tour is coming to a city near you! *Disclosure

Read more →

Haircolorist Michael Angelo Offers 10 Tips To Pamper Your Color-Treated Hair

Shannon Smyth2 comments
Michael Angelo_haircoloristI don't know about you, but I color and highlight my hair. And trying to stretch my dollar as much as I can, maintaining the color for as long as possible is super important to me. Michael Angelo, certified haircolorist and owner of The Michael Angelo Hair Studio and The Michael Angelo Masterpiece Haircare product line, is an expert in advanced haircoloring techniques and fashion forward hairstyles. Known by many within the professional beauty industry as "The Haircolor Guru", Michael Angelo has pioneered the art of turning haircolor into visual works of art. Michael Angelo knows the importance of properly handling your color-treated hair in between salon visits. He has provided ten essential tips to pamper your color treated hair, restoring shine and manageability:
  • Tip 1: Trim your hair every four to six weeks to remove split ends and to help make your hair more manageable. A great haircut is the best foundation for keeping your hair healthy and looking its best.
  • Tip 2: Use a shampoo specifically formulated for haircolor treated hair. If you must wash your hair every day, shampoo only once. When you shampoo, avoid tugging your hair and wash gently. Rinse thoroughly to remove all traces of shampoo. Michael Angelo recommends products like Mane-Tain Shampoo by Michael Angelo Masterpiece Haircare. This professional haircolor safe shampoo gently cleanses, restoring your hairs essential nutrients and natural beauty.
  • Tip 3: Use a conditioner formulated specifically for color-treated hair and apply it to your hair every time you shampoo. It is best to apply an additional amount to the ends of your hair and to rinse thoroughly to remove all traces and minimize any film that can hide your natural shine. Michael Angelo recommends Main-Tain Conditioner. The unique formula is infused with structurizing proteins and botanicals to penetrate into your hair shaft, producing benefits above and beyond any singular protein conditioner.
  • Tip 4: Invest in a special micro-fiber towel that removes excess moisture from your hair after you shampoo and condition. These towels absorb more moisture than regular bath towels and can cut down on drying time. Once your hair is towel dried, use a wide-tooth comb to detangle your hair. Wide tooth combs are less likely to cause split ends and breakage.
  • Tip 5: After you towel dry your hair, allow your hair to minimally air dry prior to blow drying. The more heat you apply to your hair, the more damage you can inflict to the cuticle.
  • Tip 6: Avoid curling irons, hot rollers and flat irons as much as possible. It is best to style your hair with a brush and a blow dryer. When you do opt for styling your hair with heat activated appliances, always apply a protective hairstyling aid directly on your hair to keep moisture locked in like Inner Fuel by Michael Angelo Masterpiece Haircare.
  • Tip 7: If you do apply styling products like a mousse, styling gel or hair spray, apply them sparingly. Many of these hairstyling products contain drying chemicals that can dull the haircolor and shine.
  • Tip 8: Avoid chlorine. If you do swim, thoroughly wash the chorine out of your hair immediately with a special haircolor safe clarifying shampoo.
  • Tip 9: Try to avoid excessive sun exposure to your color-treated hair. UV and UVB rays from the sun and indoor tanning beds and booths can leave your hair looking look less vibrant and lacking shine. If you are a sunbather, it is best to help protect your haircolor with products that contain UV ray protection.
  • Tip 10: Always take the time to consult with your professional haircolorist prior to receiving your haircolor treatments. Ask questions on the best way to maintain your haircolor in between salon visits and haircoloring services. Ask about future haircolor options.

Read more →